Where To Inject B12 In Arm giving b12 injection in arm How to Give B12 Injections at Home to Yourself · PA Relief
Introduction
If you’re trying to manage B12 deficiency with self-injected therapy, the part that often causes the most stress isn’t the needle—it’s figuring out where to inject B12 in arm safely and consistently. In my hands-on work helping patients prepare for at-home injections, the most common mistakes I’ve seen are choosing the wrong muscle site, injecting too shallow/too deep, or skipping the basics of sterility and needle handling. In this guide, I’ll walk you through a practical, step-by-step approach to giving a B12 injection in the arm, using evidence-based injection technique concepts, clear anatomical landmarks, and a safety-first checklist.
Important: This article is educational. Always follow your clinician’s specific instructions for your prescription (dose, frequency, route, needle gauge/length, and whether you should inject yourself or have help).
Before You Inject: Confirm the Route, Dose, and Site
“B12 injection in arm” can mean different things depending on the medication formulation and your clinician’s plan. The same patient may have different instructions for intramuscular (IM) versus subcutaneous (SC) administration, and different needle sizes change what “correct depth” looks like.
What I check every time
- Prescription label: exact dose (e.g., mcg per mL) and whether it’s IM or SC.
- Needle instructions: needle length and gauge provided with the prescription.
- Frequency: how often you’re instructed to inject (and whether sites should be rotated).
- Condition and contraindications: bruising risk, blood thinners, clotting disorders, infection at the site, or nerve issues.
Why route matters
If your clinician prescribed IM injections, the goal is to deposit medication into the muscle to achieve predictable absorption. If it’s SC, the approach and acceptable injection plane differ. Injecting in the wrong layer can increase irritation and make absorption less reliable. In my experience, route confusion is a bigger issue than people realize—especially when someone switches brands or needle kits.
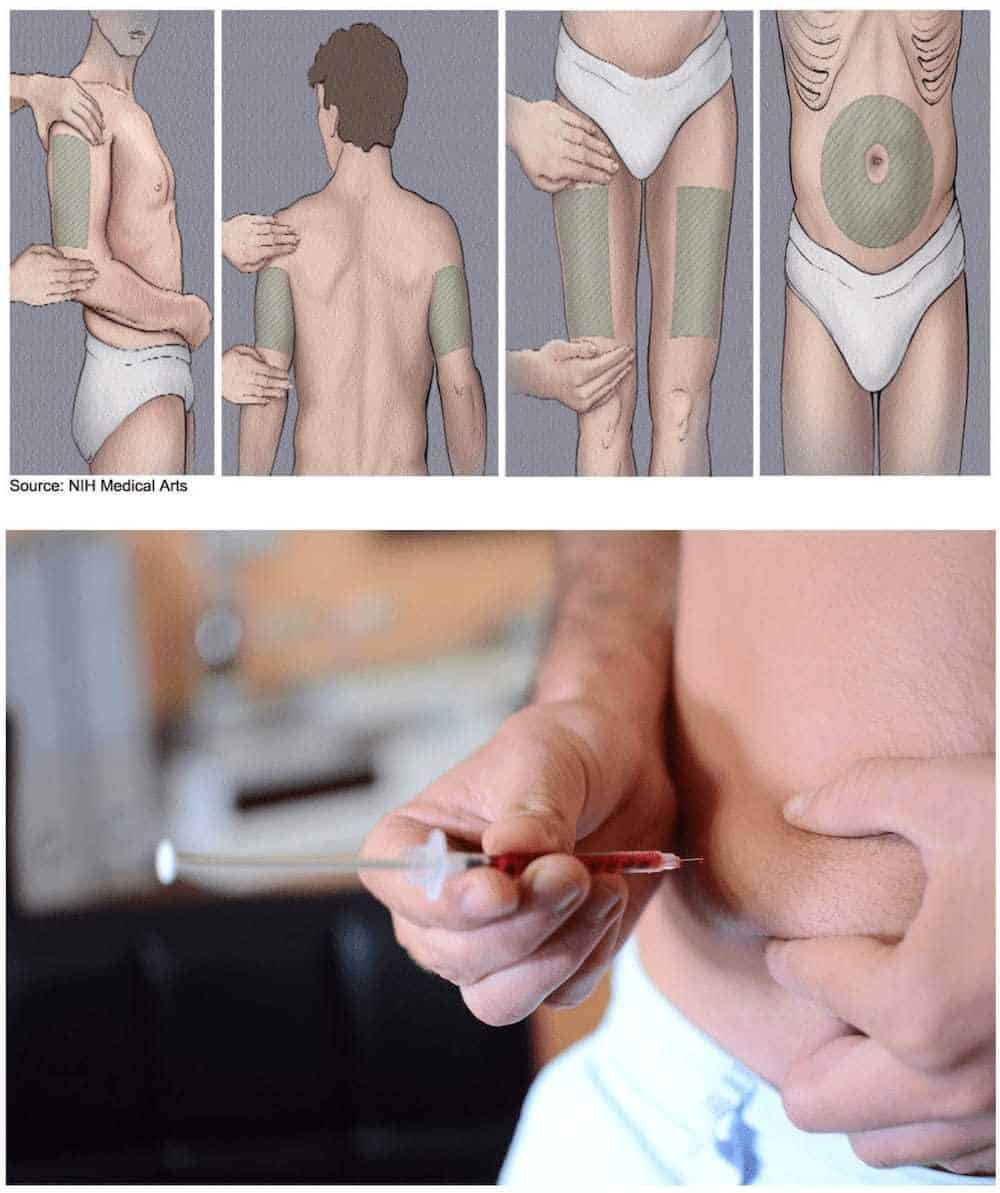
Where to Inject B12 in the Arm (Anatomical Landmarks)
When people ask where to inject b12 in arm, they typically mean an IM injection into the upper arm using a consistent muscle landmark. For at-home self-injection, clinicians often recommend the deltoid muscle (outer upper arm) because it’s accessible.
General rule of thumb: choose the outer upper arm area over the deltoid—not the front or inner arm where major nerves and vessels can run closer to the surface.
How to locate the deltoid site
- Stand or sit with your arm relaxed.
- Find the outer edge of the upper arm (the “cap” area).
- Target the middle of the deltoid area on the outer arm.
- Avoid injecting too high near the shoulder joint and avoid injecting too low into the upper arm’s inner/near-armpit region.
In practical terms, the safest at-home approach I’ve seen works best when someone consistently uses the same “outer upper arm middle” landmark and rotates sides (and/or rotates within the recommended zone) as your clinician directs.
What you should NOT do
- Don’t inject into the inner arm or near the armpit.
- Don’t inject over rash, swelling, bruising, or infection.
- Don’t choose a spot just because it “feels easier” to reach if it’s not the recommended muscle zone.
- Don’t repeatedly inject the exact same point without site rotation guidance.
Step-by-Step: Giving an IM B12 Injection in the Arm Safely
This section focuses on IM technique in the arm. Your clinician may specify a different method—especially if you were prescribed SC injections.
What you’ll need
- Your B12 medication (vial/ampule) and the correct needles/syringes
- Alcohol swabs
- Gauze/cotton
- A sharps disposal container
- Gloves (optional, but helpful if you prefer extra protection)
My practical workflow for fewer mistakes
- Wash hands thoroughly and set out supplies on a clean surface.
- Inspect the medication: check the label and appearance as directed (do not use if contaminated or expired).
- Prepare the syringe with the prescribed dose using the technique your clinician taught (including air handling if applicable).
- Choose the deltoid landmark on the outer upper arm.
- Clean the skin with an alcohol swab and allow it to air dry. (I’ve found people rush this step and then wonder why irritation is worse.)
- Position your arm: keep it relaxed. If needed, support it so you don’t tense up.
- Insert the needle using the angle your clinician provides (commonly described as a direct IM approach rather than a shallow “skin-only” approach).
- Inject steadily at a controlled pace. Avoid forcing or rushing.
- Withdraw the needle and apply gentle pressure with gauze.
- Dispose immediately in a sharps container. Do not recap unless your clinician specifically instructs a method for your device type.
What “normal” vs “concerning” looks like
- Common, usually mild: brief soreness, small bruise, slight redness, or a mild ache for a day or two.
- Get medical help if: worsening pain, spreading redness, drainage, fever, allergic symptoms, or persistent numbness/weakness.
Common Self-Injection Problems (and How to Fix Them)
In at-home B12 injection coaching, the same issues show up repeatedly. Here are the ones that most often connect back to site selection and technique.
1) Injecting too “off” the landmark
If you’re injecting too far inward or too low/high, you may hit areas that are less appropriate for IM delivery and more likely to cause discomfort. Stick to the outer upper arm deltoid zone and rotate sides.
2) Needle depth mismatch
Needle length and your body’s tissue depth affect whether the medicine reaches the intended layer. If you consistently feel extreme resistance, severe pain, or the injection area stays very inflamed, ask your clinician about whether your needle length is appropriate.
3) Rushing skin prep or handling the needle
Rushing the alcohol-dry time or reusing contaminated supplies can increase irritation. I recommend slowing down your setup so the moment you clean the skin, you’re ready to inject—no distractions.
4) Not rotating sites as advised
Even when you inject correctly, repeating the same spot can contribute to scar tissue or localized tenderness. Follow your prescriber’s instructions on rotation (and whether to rotate between left/right deltoids or use additional sites if appropriate).
Special Notes for At-Home Safety and Comfort
- If you have trouble reaching your deltoid, you may benefit from using a consistent approach where a partner/family member helps—or discuss alternate sites with your clinician.
- If you’re on blood thinners or have easy bruising, you should be extra cautious and follow clinician guidance closely.
- If you’re anxious, practice the motions without the needle first (with a safe placebo setup if your clinician permits). Many people tense up during insertion, which can make it harder to place correctly.
FAQ
Where exactly should I inject B12 in my arm?
For an arm IM injection, the common self-injection site is the deltoid muscle on the outer upper arm. Use the middle of the deltoid area and avoid the inner arm/armpit region. Your clinician’s guidance for your exact needle and dose takes priority.
Can I inject B12 in the same arm every time?
You may inject into the arm your clinician recommends, but site rotation matters. Typically this means rotating between the left and right deltoid (and, within the recommended zone) if appropriate. Ask your prescriber for the rotation schedule that fits your situation.
What should I do if I hit a painful area or I’m bleeding?
A small amount of spotting or minor bruising can happen. If bleeding is more than expected, pain is severe, you notice spreading redness, drainage, fever, or any neurologic symptoms (numbness/weakness), contact your clinician promptly for advice.
Conclusion
Getting B12 injections at home is very doable when you focus on two things: correct site selection and consistent technique. When you’re asking where to inject b12 in arm, aim for the outer upper arm (deltoid) landmark your clinician recommends, avoid problem skin areas, and follow a steady, clean, safety-first injection workflow.
Next step: If you haven’t already, review your prescription route (IM vs SC) and confirm the exact deltoid landmark and needle size with your clinician—then practice your setup steps (without the needle) so your injection day is calm and repeatable.
Discussion