Where Are B12 Injections Given Best Vitamin B12 Injection Sites: Where to Inject B12 · PA Relief
If you’ve ever looked at a prescription for a vitamin B12 injection and wondered where are B12 injections given, you’re not alone. In my hands-on work training patients and caregivers, the most common first concern is comfort and safety—especially choosing injection sites that reduce pain, lower irritation risk, and make dose delivery consistent. This guide walks you through the best vitamin B12 injection sites, how professionals decide between them, and what to do before and after the injection for better outcomes—plus practical cautions for when to ask your clinician.
Why injection site matters for B12 shots
Vitamin B12 injections are often prescribed for conditions like pernicious anemia, B12 malabsorption, or severe deficiency when oral options aren’t enough. The medication route and technique matter because the depth and tissue characteristics at the injection site influence absorption and local side effects.
In practice, clinicians aim for:
- Consistent delivery: the needle reaches the intended tissue depth.
- Lower irritation: avoiding areas with superficial nerves, blood vessels, or frequent friction.
- Better tolerance: reducing swelling, bruising, and tenderness.
I’ve seen that patients do best when they’re taught not just “where to inject,” but also “how to choose the safest spot for their anatomy” and when to rotate sites.
Common vitamin B12 injection sites
Most B12 injections are given either intramuscular (IM) or subcutaneous (SC), depending on the specific product and your prescriber’s instructions. The site selection below focuses on the two most common injection patterns.
1) Intramuscular (IM) sites
IM B12 is typically delivered into muscle. In my experience, IM site selection is where many people feel anxious—because muscle anatomy varies, and needle length must match the goal depth.
Deltoid (upper arm)
The deltoid is often used for smaller volumes and in some clinical schedules. It can be convenient for self-injection if you have good range of motion and feel comfortable locating the muscle belly.
- Best for: appropriate IM dosing where your clinician confirms deltoid use.
- Pros: accessible and easy to visualize.
- Cons: technique errors happen if you inject too high/low or too superficial.
Ventrogluteal (hip area)
The ventrogluteal site (front/side hip region) is commonly considered a robust option because the anatomy can help reduce risk of hitting major nerves or vessels. I like this site when patients are comfortable with the landmarking because it’s often a “stable” muscle target.
- Best for: many adults needing reliable IM placement (clinician guidance required).
- Pros: strong safety profile when landmarks are correct.
- Cons: can be harder for self-injection—many prefer a caregiver or training session.
Vastus lateralis (front outer thigh)
The vastus lateralis is another frequently used IM option. In hands-on training, it’s a go-to choice for self-administration because the muscle is prominent and accessible.
- Best for: self-injection where your prescribed instructions allow thigh IM shots.
- Pros: good access; easy to locate when you use consistent landmarks.
- Cons: tenderness may increase if you rotate poorly or inject into the same spot.
Note on dorsogluteal (upper outer buttock)
Some older instructions referenced the upper outer buttock. However, many training protocols emphasize avoiding the “dorsogluteal” approach due to landmark variability. If your prescriber or nurse specifically instructs this site, follow their exact method; otherwise, ask whether your injection plan should use deltoid/ventrogluteal/vastus lateralis instead.
2) Subcutaneous (SC) sites
For SC administration, medication goes into the layer of tissue just beneath the skin. SC routes are often selected when appropriate for the formulation and dosing plan.
Abdomen (around the belly, avoiding the midline)
Many people find the abdomen easier for SC injections. I recommend rotating areas within the abdomen rather than repeatedly using the exact same spot.
- Pros: easy access for many patients.
- Cons: avoid areas with scars, irritation, or bruising.
Thigh (for SC, different placement than IM)
The thigh can also be used for SC injections, but the angle and depth differ from IM technique.
- Pros: good alternative when abdomen isn’t comfortable.
- Cons: the biggest risk is confusing IM vs SC depth.
How to choose the best B12 injection site for you
In real-world practice, “best site” isn’t universal—it’s the site that matches your prescription, your comfort level, and your anatomy. Here’s a practical decision framework I use with patients:
| Consideration | What it affects | Practical choice |
|---|---|---|
| Prescribed route (IM vs SC) | Depth, angle, and landmarks | Use only the injection sites your clinician specifies for that route |
| Self-injection vs caregiver | Accuracy and consistency | If self-administering is difficult, choose easier-to-access sites or plan caregiver shots |
| Body habitus and muscle/tissue landmarks | Needle depth and comfort | Pick a site where you can reliably reach the intended tissue without “guessing” |
| Prior irritation in certain areas | Bruising, lumps, soreness | Rotate away from tender or inflamed spots |
Injection site rotation: a technique that reduces problems
One of the most actionable improvements I’ve seen is consistent site rotation. Rotating helps distribute trauma and reduces the chance of repeated inflammation in the same area.
- Keep a simple log: note the date and site used.
- Rotate systematically: for example, left thigh → right thigh → deltoid (if appropriate) → alternate.
- Avoid the exact same spot: even if it’s within the same region, don’t reuse the identical point.
If you develop persistent lumps, significant bruising, or recurring pain at one location, pause that site and ask your clinician how to adjust your plan.
Before and after injection: what to do for comfort and safety
Before
- Confirm route and site: double-check whether your prescription is IM or SC and which sites are approved.
- Gather supplies: include alcohol swabs, gauze, and a proper sharps container.
- Check the medication: look at the vial/ampule label and follow storage instructions provided by your clinician or pharmacy.
- Use proper skin prep: clean the site with an alcohol swab and let it dry.
After
- Gently apply pressure if needed: light pressure can reduce bleeding/bruise formation.
- Watch the first 24–48 hours: mild soreness can be normal; worsening swelling or severe pain isn’t.
- Avoid rubbing hard: friction can irritate tissue.
- Track symptoms: if you notice unusual reactions, contact your prescriber.
Common mistakes people make with B12 injection sites
These are the issues I’ve most often seen during training sessions:
- Confusing IM and SC depth: using the wrong technique for the prescribed route.
- Inconsistent landmarks: injecting “close enough” instead of using a consistent reference area.
- Reusing the same spot: leading to recurring soreness, bruising, or lumps.
- Skipping training: attempting self-injection without learning site identification and needle handling basics.
If you’re unsure about your injection site or technique, a single nurse-led practice session (with feedback) can prevent months of discomfort and guesswork.
FAQ
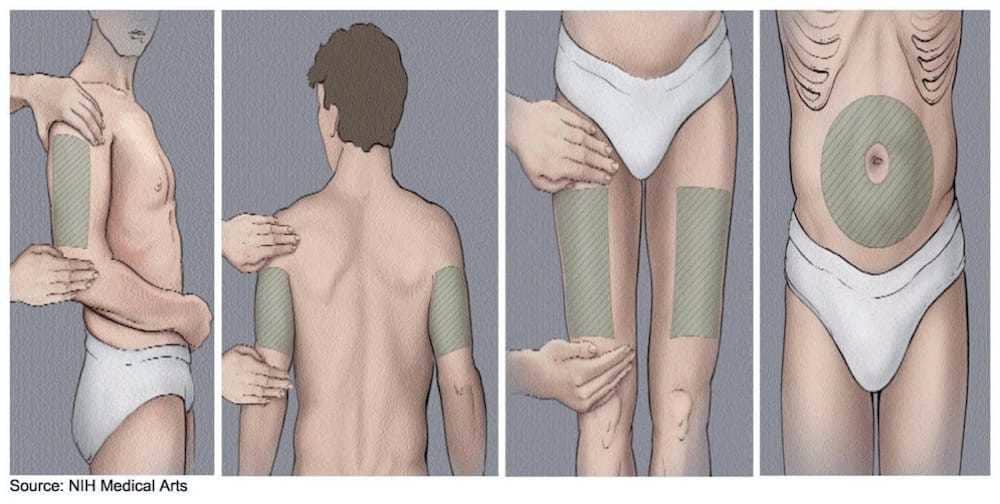
Where are B12 injections given?
B12 injections are given in specific approved injection sites depending on whether your prescription is intramuscular (IM) or subcutaneous (SC). IM commonly uses the deltoid (upper arm), ventrogluteal (hip area), or vastus lateralis (outer front thigh). SC commonly uses areas like the abdomen or certain thigh regions. Always follow your prescriber’s exact site and route instructions.
Which injection site is best for self-injection?
For many people, the thigh (vastus lateralis for IM, or the appropriate thigh area for SC if allowed) is the most practical for self-administration due to access and landmark visibility. The best choice is the one you can consistently locate and inject with the correct depth for your prescribed route.
What should I do if my B12 injection site is sore or bruised?
Mild soreness or a small bruise can occur. Use gentle aftercare (light pressure if needed, avoid heavy rubbing) and rotate away from that exact point next time. Contact your clinician if pain is severe, swelling is significant, symptoms worsen, or you notice signs of infection or an allergic reaction.
Conclusion: a practical next step
Choosing where B12 injections are given is about matching the correct route (IM vs SC) with reliable, repeatable landmarks, then rotating sites to reduce irritation. In my experience, patients feel the biggest improvement when they stop “guessing” and instead follow a consistent site plan taught by a clinician, using a simple rotation log.
Next step: Ask your prescriber or nurse to confirm your injection route (IM or SC) and the exact approved sites for your B12 product, then practice site identification once—so your future B12 injections feel controlled, consistent, and comfortable.
Discussion