B12 Sub Q Injection Sites How to Give B12 Injections at Home to Yourself · PA Relief
Introduction: Why “b12 sub q injection sites” matter more than most people think
If you’ve ever looked at a B12 injection instruction sheet and wondered, “Where exactly am I supposed to inject— and is it safe in my body?”, you’re not alone. I’ve coached patients and done hands-on training in home-injection routines where the biggest barrier wasn’t fear of needles—it was confusion about b12 sub q injection sites, technique, and preventing irritation.
This guide walks you through choosing and preparing the right injection sites for B12 subcutaneous (SubQ) injections at home, how to rotate sites, and what to do if something feels off. You’ll finish with a practical, step-by-step plan you can follow confidently.
Before you start: confirm you’re doing SubQ (not IM)
B12 injections can be prescribed as either intramuscular (IM) or subcutaneous (SubQ), and the injection sites are different. The steps below assume you’ve been instructed by your clinician to do SubQ.
- SubQ: injected into the fatty tissue under the skin.
- IM: injected into muscle and uses different locations.
In my hands-on work, I’ve seen errors happen when people mixed up instructions for their medication label or shared family guidance. A quick way to avoid that is to match your technique to the exact prescription instructions your prescriber gave you (and if you’re unsure, ask before injecting).
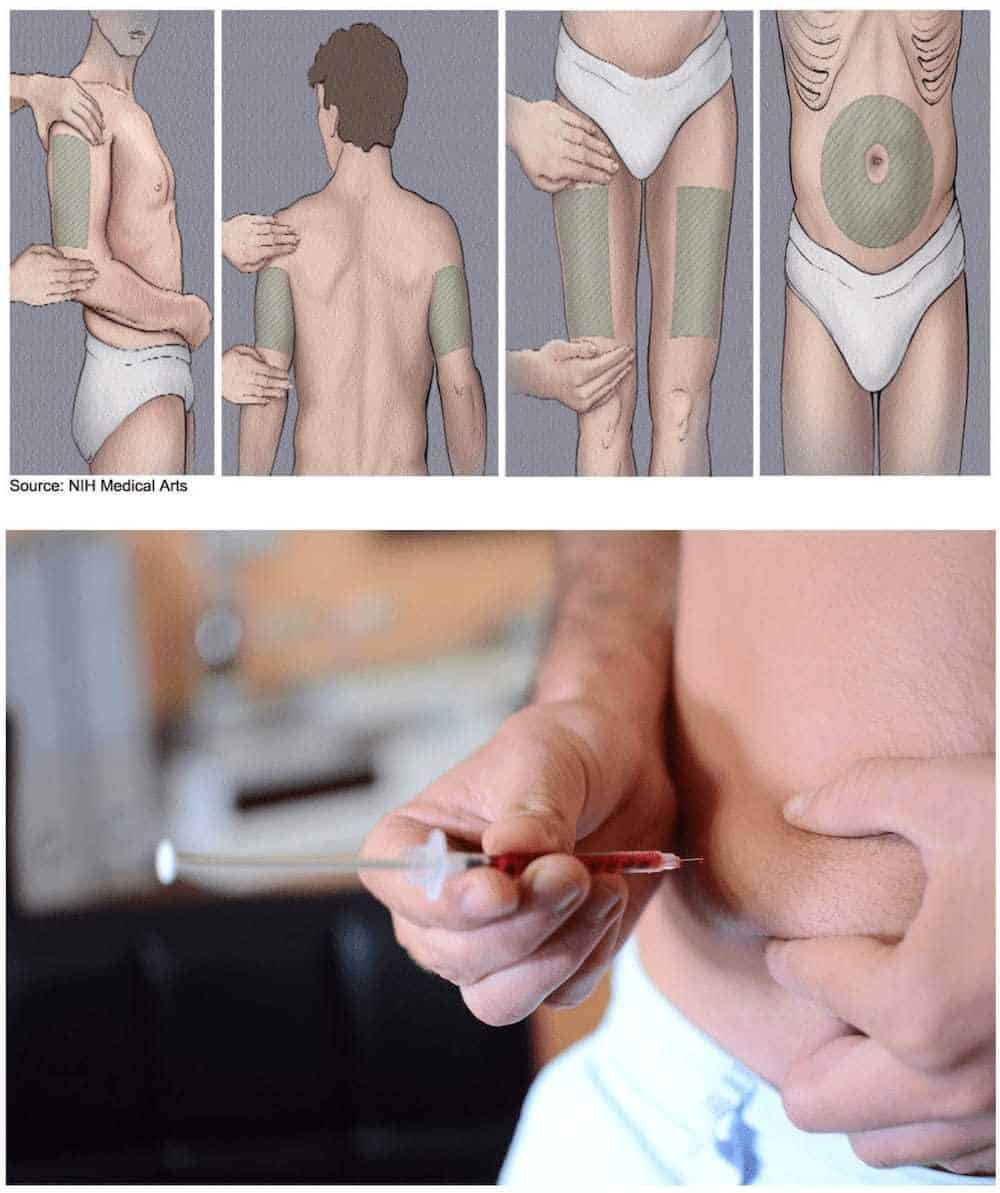
B12 SubQ injection sites: the practical “where”
When people search for b12 sub q injection sites, they usually want two things: (1) locations that are easy to reach at home, and (2) areas that are typically well-suited for SubQ absorption with less risk of hitting deeper structures.
Best common SubQ sites
These are commonly used for SubQ injections:
- Abdomen (lower belly): at least 2 inches (about 5 cm) away from your navel.
- Front or outer thigh: upper outer thigh is often easiest when self-injecting.
- Back of upper arm (triceps area): usually requires better positioning or help from someone else.
Site rotation: how to prevent repeated irritation
In my experience, the most common complaint after starting home SubQ injections is local soreness, redness, or thickened tissue from repeated use of the same spot. Site rotation reduces that.
- Pick one main area (e.g., abdomen), then move to a new spot each dose.
- Don’t inject through irritated skin or over any lumps.
- As a rule of thumb, don’t use the exact same pin-point location back-to-back.
How I choose the “right spot” during training
When I help someone practice, I look for three practical indicators:
- There’s enough skin/fat to pinch (SubQ should be easy to lift gently).
- You can inject with good control (steady angle, relaxed grip).
- The area looks healthy (no rash, bruising, infection, or open wounds).
Visual reference: where injection sites are commonly located
Step-by-step: giving a B12 SubQ injection to yourself (safe, repeatable method)
Below is a practical workflow I use when coaching people through home injections. Follow your prescriber’s instructions first if they differ.
What you’ll need
- B12 medication (as prescribed)
- Syringe/needle and any device your prescription includes
- Alcohol swabs
- Sharps disposal container
- Clean surface and good lighting
1) Prepare and wash up
- Wash hands thoroughly.
- Set out everything so you’re not reaching around mid-injection.
2) Select the injection site and rotate
- Choose from the abdomen, thigh, or—if you can manage it safely—the upper arm.
- Avoid the exact same site each time.
- Avoid spots that are red, swollen, bruised, infected, or scarred.
3) Clean the skin
- Use an alcohol swab on the chosen site.
- Let it dry (don’t blow on it).
4) Form the SubQ “pinch” (when appropriate)
For SubQ injections, you typically lift a fold of skin/fat. This helps you stay in the subcutaneous layer rather than deeper tissue.
5) Insert the needle with controlled technique
Your prescriber may specify an angle (commonly angled or straight depending on needle length and body habitus). Use the technique you were taught for your specific needle and dose.
- Keep the injection site stable with your non-dominant hand.
- Inject smoothly and steadily.
6) Inject the medication slowly
- Slow injection often reduces “pressure” discomfort.
- Stop if you feel severe pain, resistance, or you think you’re in the wrong layer—then contact your clinician for guidance.
7) Withdraw, then care for the site
- Withdraw the needle carefully.
- Press gently with clean gauze if needed.
- Don’t rub aggressively (it can worsen irritation).
Troubleshooting: what to do if the site feels “off”
Most injection reactions are minor and temporary. Still, you want a clear plan.
Common mild reactions
- Soreness: usually improves within a day or two.
- Small redness: can happen after injections.
- Light bruising: more likely if you moved during insertion.
When to pause and call your clinician
- Increasing redness, warmth, swelling, or worsening pain
- Drainage, fever, or signs of infection
- Repeated problems at multiple consecutive injections (could indicate technique or site selection issues)
In my experience, most escalation cases involve a combination of injecting into the same spot too often, injecting through irritated skin, or not letting the alcohol dry—leading to more irritation than necessary.
Practical tips that improve comfort (and consistency)
- Use good lighting—it matters more than people expect for accurate site placement.
- Rotate systematically: for example, abdomen left-to-right in a pattern, then switch to thigh.
- Don’t inject cold medication if your clinician allows: bring it to room temperature if instructed, to reduce discomfort.
- Keep your routine consistent (same time of day, similar preparation steps).
FAQ
What are the most common b12 sub q injection sites for self-injection?
The most commonly used SubQ sites are the lower abdomen (staying away from the navel), the outer or front thigh, and—when positioning is comfortable— the back of the upper arm. The easiest sites for many people are abdomen and thigh.
How do I rotate b12 sub q injection sites to avoid soreness?
Choose one primary area (like abdomen), then move to a new spot for each dose. Avoid reusing the exact same pin-point location back-to-back. Also skip sites that are red, bruised, or feel firm or tender.
Can I inject B12 SubQ if I’m overweight or have little body fat?
Yes, SubQ can still be appropriate, but technique matters. If there isn’t enough subcutaneous tissue to pinch comfortably, ask your clinician or nurse for guidance on angle, needle choice, and whether SubQ vs IM is best for your situation.
Conclusion: your next practical step
Getting comfortable with b12 sub q injection sites comes down to three things: choosing a healthy site (abdomen, thigh, or suitable upper arm), rotating systematically to prevent irritation, and using a steady, controlled SubQ technique.
Next step: pick one rotation pattern for the next 2–4 weeks (for example, abdomen then thigh), write it down, and practice the site selection and skin-prep steps without rushing—so your first injection in each new area feels predictable and controlled.
Discussion