Inject B12 Into Thigh How to Give Yourself Intramuscular (IM) Injections | Patients & Families
If you or a loved one has been prescribed injections, the first thing you probably want to know is this: how do I do it safely, without causing unnecessary pain or complications? In this guide, I’ll walk you through how to give yourself an intramuscular (IM) injection step-by-step—specifically including how to inject b12 into thigh—with practical, patient-and-family-friendly instructions. I’ll also cover common mistakes I’ve seen in real-world training sessions, what to do if something feels off, and how to keep the process calm and consistent.
What an IM Injection Is (and Why It Matters)
An intramuscular (IM) injection places medication into muscle tissue so the drug can absorb at the right rate. For medications like vitamin B12 (often used to treat deficiency or certain nerve-related conditions), clinicians commonly prescribe an IM route for reliable absorption.
In my hands-on work teaching patients and families, the biggest “aha” moment comes when people understand that safety is mostly about three things: using the right site, using the right technique, and preventing contamination. If those are correct, the injection is usually straightforward.
Before You Start: Safety Checks That Prevent Problems
Start here every time. I’ve learned to treat these as non-negotiables—because they prevent the most common failures (wrong dose, wrong medicine, infection risk, or choosing a poor injection site).
Verify the prescription
- Confirm the medication name and dose on the label.
- Check the frequency (how often) and any instructions about timing.
- Make sure the medication looks appropriate (some forms should be clear; others may be cloudy—follow your prescriber’s guidance).
Get the supplies ready
- Alcohol wipes or swabs
- Gauze or cotton ball (if needed)
- Appropriate syringe and needle (your prescription or clinician will specify size)
- Sharps container (or a rigid puncture-resistant disposal container)
- Bandage or small dressing (optional)
Choose the right site (focus: thigh for B12)
For the specific instruction to inject b12 into thigh, the most common IM thigh option for patients is the vastus lateralis muscle (outer-middle thigh). Using the correct thigh area reduces the risk of hitting structures that shouldn’t be injected.
If you’ve been taught a different site (for example, deltoid or ventrogluteal), follow the training you were given for your exact plan—site choice depends on age, anatomy, and the medication.
Step-by-Step: How to Give Yourself an IM Injection
Below is a practical approach designed for real patients doing injections at home. If anything conflicts with your clinician’s instructions, your clinician’s instructions win.
1) Wash hands and set up a clean workspace
I tell patients to create a “parking spot” for supplies so nothing is hunting for attention while the needle is out. Use a table with good lighting, and keep everything within arm’s reach.
2) Inspect medication and prepare it as instructed
Some B12 doses come pre-filled; others require drawing medicine from a vial. Use the preparation steps your prescriber or pharmacist taught you.
Key safety habits:
- Use aseptic technique—avoid touching needle or injection site.
- If you must re-cap or handle needles, only do so in the way you were instructed—many people accidentally contaminate the needle during recapping.
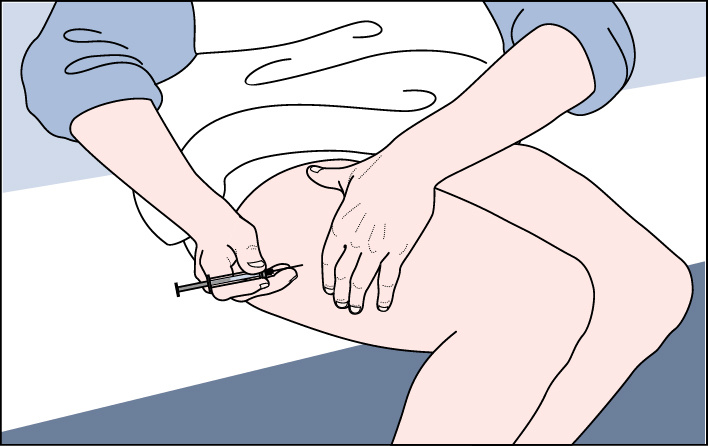
3) Select the thigh injection location
To help you inject b12 into thigh safely, locate the outer-middle area of the thigh (vastus lateralis). You want a portion of muscle with enough “meat” so the injection goes into muscle, not skin.
- Use your non-dominant hand to gently feel the area and confirm it’s muscle.
- Avoid injecting over bony prominences, irritated skin, rashes, or areas with lumps or scars unless specifically directed.
4) Clean the skin
Wipe the injection site with an alcohol swab and let it air dry. In my experience, rushing this step increases sting and can raise the chance of contamination.
5) Position the body for steadiness
For thigh injections:
- Sit or stand so you can access the outer-middle thigh.
- Try to relax the muscle. Tensing makes injections feel worse and can make aiming harder.
6) Insert the needle correctly
Using the technique taught to you, insert the needle into the muscle at the prescribed angle (your clinician will specify needle angle and depth). Keep the injection site stable and use a controlled motion.
Common real-world lesson: Patients often pause mid-motion because they’re anxious. I recommend focusing on a single smooth insertion rather than “hunting” once the needle is partially inserted.
7) Administer the medication
Press the plunger steadily. If the medication is more than a small volume, you may need a slightly slower pace. Many patients find that a steady rhythm reduces discomfort.
Important: Follow the dosing volume and rate guidance provided by your clinician. If you weren’t taught a rate, ask before attempting.
8) Withdraw the needle and apply pressure
Remove the needle using the same controlled approach. Then use gauze or a cotton ball to apply gentle pressure to the site. A bandage can be used if needed.
Minor soreness is common, but worsening pain, increasing redness, or fever are not normal—see the section below on when to get help.
9) Dispose of sharps safely
Immediately place the needle and syringe into a sharps container. Do not recap needles unless your clinician specifically instructed a safe method for your situation.
Where People Get Stuck: Mistakes I’ve Seen During Training
Mistake 1: Choosing an unclear injection spot
If the thigh area isn’t clearly located, don’t “guess.” I’ve seen patients pick a spot too close to the outer edge of the thigh or too high where muscle changes. If you’re unsure, ask your clinician or nurse to mark the location with you.
Mistake 2: Injecting into irritated or scarred skin
Medication absorption and comfort can change, and skin integrity matters for safety. Choose a site that is clean and healthy.
Mistake 3: Moving the leg/muscle during insertion
Try to keep the thigh relaxed and stable. Body tension is a major driver of pain perception during IM injections.
Mistake 4: Contamination during preparation
Over-handling the needle, touching sterile parts, or setting syringes down on non-clean surfaces are common “small” issues that can become bigger problems.
What to Expect After a B12 Thigh Injection
After you inject b12 into thigh, mild soreness, slight redness, or a tiny bruise may happen. These usually improve within a day or two.
You can consider gentle comfort measures like:
- Light movement of the leg (unless it increases pain)
- Cool compress for brief swelling (avoid prolonged direct ice contact)
Because different people respond differently, track symptoms briefly. If you consistently feel intense pain, burning, or repeated redness in the same area, that’s a reason to reassess the site and technique with a clinician.
When to Seek Medical Help
Get medical attention urgently if you experience signs of a serious reaction or infection, such as:
- Trouble breathing, swelling of the face/lips, or widespread hives
- High fever or rapidly worsening redness, warmth, or swelling at the injection site
- Severe pain that doesn’t improve
- Persistent bleeding or a large bruise that expands
- Severe dizziness or fainting
If symptoms are mild but persistent, call your prescriber for guidance.
Product Image
FAQ
How do I know if I’m injecting B12 into the correct thigh muscle?
Use the outer-middle thigh (vastus lateralis) that feels like muscle, not bone. If you feel a hard bony area or inject into irritated skin, the site is likely wrong. If you’re uncertain, ask your clinician to verify the exact spot with you.
Should I pull back on the syringe before injecting?
That depends on your specific instruction and the clinician’s protocol for your medication and needle type. Follow the guidance you received. If you weren’t taught whether to aspirate, contact your prescriber or nurse before attempting.
What if I accidentally hit a small blood vessel or see bleeding?
Small bleeding at the surface can happen. Apply gentle pressure with clean gauze and monitor the area. Seek medical advice if bleeding is heavy, the site rapidly enlarges with a bruise, or you develop worsening pain, redness, or fever.
Conclusion: Your Next Best Step
Giving yourself an IM injection is manageable when you focus on the fundamentals: correct site selection for inject b12 into thigh, clean technique, controlled insertion, steady delivery, and safe sharps disposal. In my experience, the biggest improvement happens after one real coaching session—people feel calmer and more accurate on the second and third attempt.
Actionable next step: If you haven’t been shown the exact thigh location and needle technique for your B12 prescription, schedule a brief appointment (or call your nurse) to confirm the injection spot and method—then practice using a trainer device if available.
Discussion