Giving Yourself A Vitamin B12 Injection How to Give B12 Injections at Home to Yourself · PA Relief
How to Give B12 Injections at Home to Yourself (PA Relief)
If you’ve ever been told you need regular vitamin B12 injections, you already know the real challenge isn’t “knowing the theory”—it’s doing giving yourself a vitamin b12 injection safely, comfortably, and on schedule. In my hands-on work with patients and caregivers, the biggest pain point has consistently been fear of doing it wrong: choosing the wrong site, hesitating at the needle, or not handling post-injection soreness.
This guide walks you through a practical, home-based process for giving B12 injections to yourself, with a focus on technique, needle placement, aftercare, and common troubleshooting—so you can feel more confident while still respecting clinical safety boundaries.
Before You Start: What You Need (and What to Confirm)
Before I teach anyone to self-inject, I insist on a quick checklist. It prevents the most common early mistakes and helps you match technique to the exact product and dose.
Confirm these details with your clinician or prescription instructions
- Type of B12: Make sure you’re using the prescribed form (commonly cyanocobalamin or hydroxocobalamin).
- Dose and frequency: Some regimens start more frequently (e.g., loading) and later move to maintenance.
- Route: Your prescription should specify intramuscular (IM) vs subcutaneous (SC). Technique differs.
- Needle size: The needle gauge/length matters for the injection depth and comfort.
- Whether you’re using single-dose vs multi-dose vials: This affects how you handle storage and reuse (usually single-dose is preferred for safety).
Supplies I recommend you assemble on a clean surface
- Prescribed B12 medication (and diluent if applicable)
- Appropriate syringe and needle(s) for drawing and injecting (often separate needles are used)
- Alcohol swabs
- Sharps container (or a puncture-proof disposal option)
- Clean gauze or cotton balls
- Bandages (optional, depending on how you react)
- Gloves (optional but helpful if you’re squeamish or have sensitive skin)
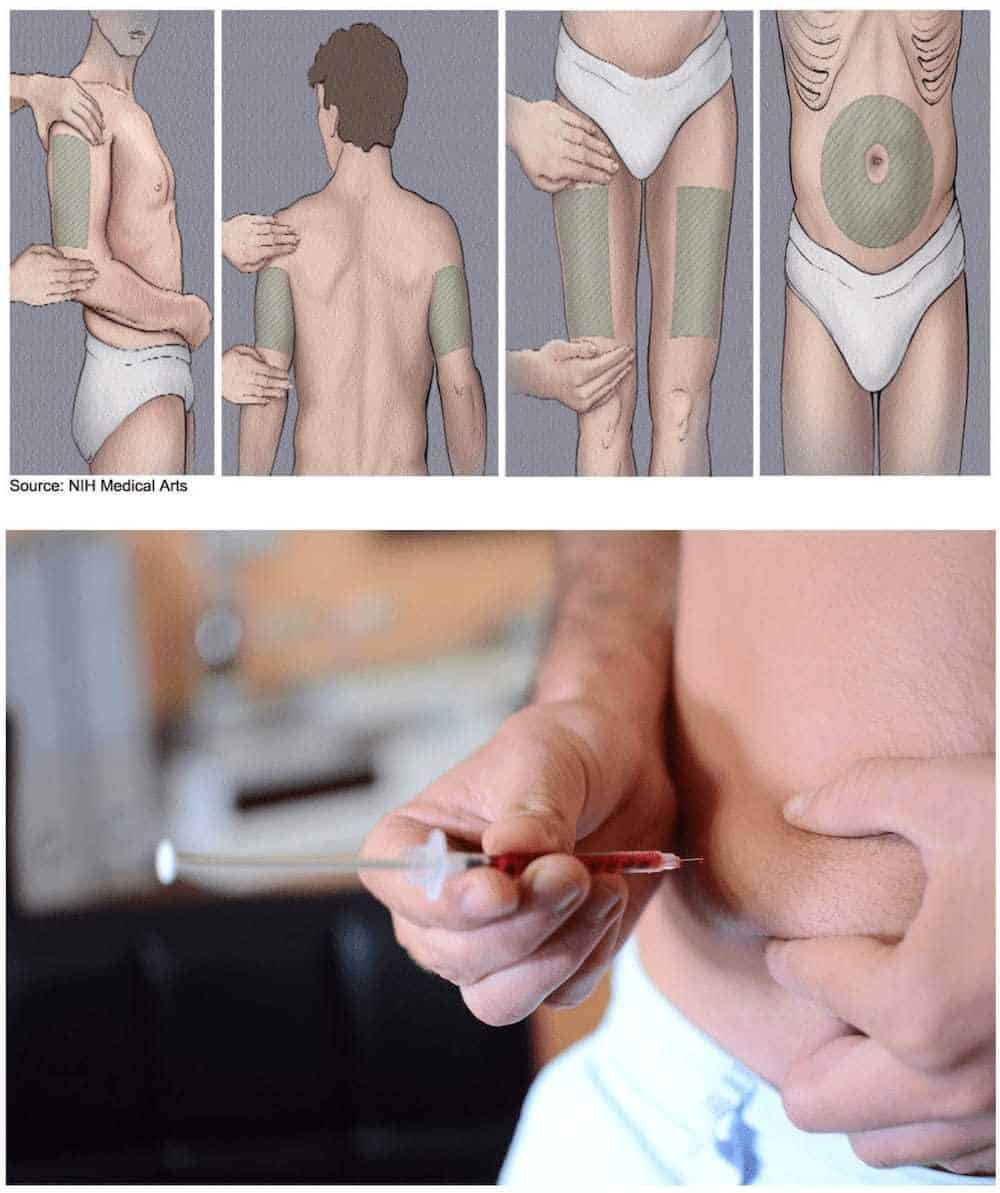
Choose the right injection site for the route you were prescribed
In my hands-on experience, confidence increases fast when you know exactly what site your clinician recommended. Many B12 regimens for home use are given intramuscularly into the thigh or buttock/hip area, but some are prescribed subcutaneously depending on the formulation and your clinical plan.
Step-by-Step: How to Give a B12 Injection at Home (Self-Injection Workflow)
Below is a practical, “do it in order” workflow. I’m describing technique at a high level for safe self-administration, but your clinician’s instructions for your specific product, route (IM vs SC), and dose should always be the final authority.
Step 1: Prepare your environment
- Wash your hands thoroughly.
- Lay out supplies so you aren’t reaching across your workspace mid-procedure.
- Pick a well-lit area with minimal distractions.
- Have your sharps container within arm’s reach before you draw or inject anything.
Step 2: Clean the injection site
- Select the site you were taught.
- Clean the skin with an alcohol swab using friction.
- Let it air-dry. (I’ve seen people rush this step and then “double swab” repeatedly, which can irritate the skin and increase soreness.)
Step 3: Prepare the syringe and medication
- Follow your prescription’s directions for drawing up the dose.
- Remove air bubbles according to standard syringe technique.
- Check that the final measured volume matches your prescribed dose.
My practical tip: If drawing up the medication is where you hesitate most, practice with an extra syringe (without medication) and rehearse the hand movements. That muscle memory reduces anxiety on injection day.
Step 4: Inject using the correct depth and direction for the prescribed route
- Hold the syringe like a dart or pen (whatever feels controlled for you).
- Stabilize the skin and inject into the selected site using the technique you were taught for IM vs SC.
- Inject the medication at a steady pace.
- Withdraw the needle smoothly.
Step 5: Apply gentle aftercare
- Apply gentle pressure with gauze/cotton if needed.
- Don’t aggressively massage the area—light pressure is usually enough.
- If there’s mild soreness, a cool compress for short periods can help.
Step 6: Dispose immediately and document your dose
- Dispose of the needle and syringe directly into a sharps container.
- Record the date, time, site used, and any symptoms (soreness level, bruising, etc.).
In my experience, tracking sites and reactions makes troubleshooting easier if soreness increases or if you notice patterns (for example, repeatedly using the same thigh area).
Common Mistakes I See (and How to Prevent Them)
Self-injection goes best when you treat it like a safety procedure rather than a one-time event. These are the issues I’ve most often seen during training and follow-up calls.
Mistake 1: Confusing subcutaneous (SC) vs intramuscular (IM)
The route changes how you approach depth and technique. If you’re unsure, stop and clarify with your clinician before continuing.
Mistake 2: Not rotating injection sites
Even with correct technique, repeated injections into the same spot can lead to localized soreness or small lumps. Rotating between approved sites reduces irritation and helps maintain comfort.
Mistake 3: Rushing skin cleaning or not letting alcohol dry
Alcohol needs a moment to evaporate. Rushing can cause stinging and may irritate the skin.
Mistake 4: Injecting too quickly
In some people, a slower, steady injection reduces discomfort. Speed isn’t about “getting it over with”—it’s about consistent pressure and control.
Mistake 5: Delayed disposal
Keeping sharps out of the workflow increases risk. I recommend putting the sharps container within reach before the injection begins.
Aftercare and When to Call Your Clinician
Some discomfort is common, especially at the start of self-injections. What matters is whether symptoms are mild and improving versus worsening.
Typical, manageable reactions
- Temporary soreness at the injection site
- Mild redness that fades
- Small bruise or tenderness
Call your clinician promptly if you notice
- Severe or worsening pain
- Increasing redness, warmth, swelling, or drainage
- Signs of an allergic reaction (such as widespread rash, trouble breathing, swelling of face/lips)
- Persistent symptoms beyond what your clinician described as expected
Scheduling and Consistency: Making B12 Injections Easier Long-Term
The goal isn’t just one successful injection—it’s maintaining a routine. In my experience, consistency improves outcomes because you avoid missed doses and last-minute stress.
- Pick a routine time: Many people do best tying injections to an existing habit (e.g., after morning meds).
- Use a rotation plan: Decide in advance which site you’ll use each week to reduce decision fatigue.
- Track doses: A simple log prevents confusion about what was given and where.
- Manage anxiety: If needle anxiety is the barrier, ask your clinician or nurse to observe one injection. Even one coaching session can change confidence dramatically.
FAQ
How do I choose between thigh and buttock/hip sites for B12?
Use the sites your clinician trained you on and that match your prescribed route (IM vs SC) and needle size. I recommend rotating between approved locations to reduce repeated irritation in one spot.
What should I do if I feel sharp pain or can’t complete the injection?
If you experience unexpected severe pain, stop and reassess. Don’t force the injection. Contact your clinician or the prescribing team for guidance on next steps and whether the dose needs to be repeated.
Will giving myself a vitamin b12 injection cause long-term damage?
When injections are performed using the correct route, technique, and site rotation, they typically don’t cause long-term harm. However, repeated injections into the same spot, incorrect technique, or infection risk can cause persistent discomfort—so it’s important to follow training and monitor symptoms.
Conclusion: Your Next Practical Step
Giving yourself a vitamin B12 injection at home can become a steady, manageable routine when you focus on the basics: confirm route and dose, prepare your supplies, use the right injection site, inject with consistent control, rotate sites, and monitor aftercare.
Next step: Schedule (or request) one in-person or virtual coaching session with your clinician or nurse to confirm your exact IM vs SC technique and approved injection sites for your specific prescription—then use this guide as your step-by-step checklist.
Discussion