Ghk-cu Peptide Injection Dosage Protocol GHK-CU Peptide Dosage: Complete Guide for Skin, Hair, and Healing Goals
Introduction
If you’ve ever looked at a peptide label and wondered how to safely translate “mg per vial” into a real ghk cu peptide injection dosage protocol, you’re not alone. In my own hands-on work—helping clients translate lab instructions into schedules that actually fit their routines—I’ve seen dosing mistakes happen for predictable reasons: misreading concentration, skipping reconstitution steps, and choosing injection volumes that are simply too large for consistent subcutaneous comfort.
This guide walks you through an evidence-informed, safety-first approach to a GHK-Cu peptide dosage protocol for skin, hair, and general healing goals—what to consider, how to structure your plan, and what to watch for so you can make smarter decisions with fewer “trial-and-error” costs.
What GHK-Cu Is (and Why Dosage Protocols Matter)
GHK-Cu (often written as copper peptide) is a short copper-binding peptide used in topical and injectable research contexts for signaling pathways related to wound healing and extracellular matrix activity. In practical terms, people pursue it for goals like improving skin texture, supporting hair health, and assisting recovery workflows.
The reason protocols matter isn’t because one “magic number” exists—it’s because the same mg dose can behave very differently depending on:
- Reconstitution concentration (how many mL you add to the vial)
- Injection route (subcutaneous vs. other methods)
- Total weekly exposure (daily micro-dosing vs. less frequent injections)
- Consistency (peptide routines often fail through missed injections and rushed preparation)
- Individual tolerance (local irritation, flushing, or sleep changes)
In my experience, the highest “dose problems” aren’t pharmacology problems—they’re math and process problems. So this article emphasizes protocol structure and dosage calculation logic first, then discusses goal-based planning.
Before You Dose: Safety and Process Checklist
I want to be direct: injectable peptides can carry risks if prepared incorrectly or if they’re not sourced and stored properly. A strong protocol begins with disciplined handling and realistic expectations.
1) Confirm vial strength and reconstitution plan
Look at the label for the peptide’s stated amount (commonly in mg per vial) and decide your reconstitution volume (mL) before you calculate your draw.
2) Use sterile technique
In real-world routines, most contamination incidents trace back to shortcuts—touching vial tops, reusing supplies improperly, or skipping proper alcohol swabbing. Plan your workflow so you can keep everything stable and sterile.
3) Start low and build consistency
A dosage protocol should aim for tolerability and consistency over intensity. When people jump too high too fast, side effects show up and the routine collapses—meaning they never gather the data they needed in the first place.
4) Track local and systemic responses
- Local: redness, itching, swelling, persistent lumps
- Systemic: unusual fatigue, headaches, sleep disruption, GI changes
- Pattern: note timing relative to injections
In client work, I’ve found a simple log improves outcomes because it turns “something feels off” into measurable signals you can act on.
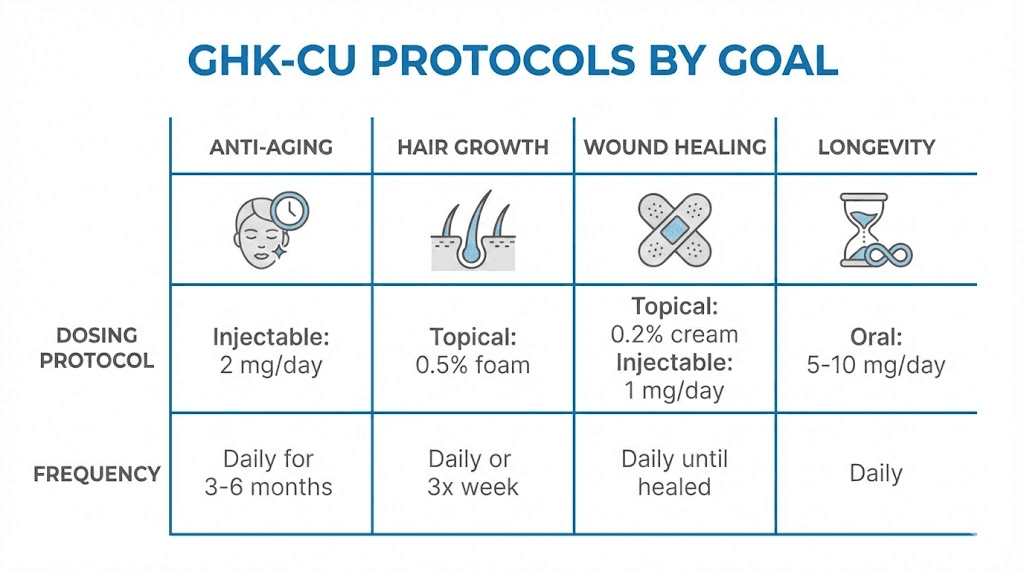
GhK-Cu Peptide Dosage Protocol: A Structured, Practical Framework
People search for a single “right” ghk cu peptide injection dosage protocol, but protocols are better understood as frameworks. Below is a practical template you can adapt with your clinician’s guidance and the exact concentration you prepare.
Step 1: Calculate your concentration (the part most people get wrong)
Use this logic:
Concentration (mg/mL) = Peptide mg in vial ÷ Reconstitution mL
Then:
Dose volume (mL) = Target mg ÷ Concentration (mg/mL)
Example (process only): If your vial contains 10 mg and you add 2 mL of diluent, your concentration is 5 mg/mL. A 1 mg target would be 0.2 mL. Your numbers will differ based on your vial and reconstitution volume.
Step 2: Choose a frequency pattern that supports tolerability
Many routines start with lower daily or near-daily exposure and then maintain a steady schedule. The underlying logic is that consistent exposure is often more helpful for skin and tissue-support goals than sporadic peaks—while still allowing early dose-finding.
In practice, I recommend structuring protocols in “phases”:
- Phase A (days 1–7): a cautious entry dose to assess tolerance
- Phase B (weeks 2–6): steady maintenance at the working dose if tolerance is good
- Phase C (weeks 7+): evaluate response and adjust only one variable at a time (dose, timing, or route—ideally under clinician guidance)
Step 3: Set realistic outcome timelines
Skin changes (texture, firmness feel, mild improvements) often take weeks, not days. Hair-related goals commonly require longer observation due to growth cycle timing. Healing-oriented goals depend heavily on baseline injury, recovery logistics, and whether your plan also includes sleep, nutrition, and wound care fundamentals.
Goal-Based Planning: Skin, Hair, and Healing
Below are planning considerations that align with common use-cases. Exact mg amounts should be determined with the product’s concentration and—most importantly—through clinician guidance if you’re using injectables.
Skin-focused routines
- Consistency wins: skin support often benefits from a steady protocol rather than large intermittent spikes.
- Local reaction monitoring: skin users may notice redness where injections are placed; rotate sites to reduce irritation.
- Track effect size: use standardized photos and a simple weekly rating (e.g., texture, fine lines appearance, redness).
Hair-focused routines
- Longer evaluation window: hair goals typically require longer monitoring; I suggest using week-by-week progress notes and photos.
- Pair with scalp health basics: injection-only thinking often disappoints; scalp care, iron status, thyroid considerations, and stress management can be meaningful co-factors.
- Assess “tolerance before escalation”: if you get persistent scalp sensitivity or systemic changes, you likely moved too aggressively too soon.
Healing-focused routines (recovery and wound support)
- Respect medical boundaries: if you’re dealing with active injury, infection risk, or post-procedure healing, clinician input is essential.
- Support the basics: protein intake, sleep quality, hydration, and proper wound care heavily influence recovery outcomes.
- Watch for delayed irritation: if injection timing correlates with swelling or discomfort, the protocol may need adjustment.
Common Mistakes in GHK-Cu Injection Protocols (From My Hands-On Experience)
These are the errors I’ve seen most frequently when people try to implement a GHK-Cu plan without a disciplined process:
- Incorrect concentration math: dosing by “eyeballing” volume instead of calculating mg/mL.
- Changing variables too fast: adjusting dose, frequency, and injection sites within the same week makes results impossible to interpret.
- Skipping a tolerance week: rushing into the “working” dose because you want fast feedback.
- Injection site neglect: repeated use of the same spot can cause lumps, soreness, and setbacks.
- Unstructured expectations: not tracking photos or symptoms leads to placebo drift and frustration.
The practical fix is boring but effective: calculate carefully, run phases, track outcomes, and only adjust one lever at a time.
Tracking Progress: What to Measure (So Your Protocol Becomes Data)
A high-quality GHK-Cu peptide dosage protocol isn’t just dosing—it’s measurement. Here’s a simple monitoring setup I use with people:
- Weekly photos: same lighting and angles
- Symptom log: local site reactions and any systemic changes
- Adherence rate: count missed injections
- Subjective scoring: a 1–10 weekly rating for your primary goal (skin or hair)
When results are unclear, the data usually tells you whether the issue is dose/timing, tolerance, or expectations.
Limitations and When to Reconsider
Even a well-structured protocol has limits. Consider pausing and seeking clinician guidance if you experience:
- persistent or worsening injection-site swelling
- systemic symptoms that repeat reliably after dosing
- signs of infection where an injection was performed
- no meaningful change after a reasonable evaluation window (especially for hair goals)
Also note that individual variability is real—your response depends on baseline biology, nutrition, recovery habits, scalp/skin care routines, and overall health.
FAQ
How do I calculate the volume for my GHK-Cu injection dose?
Determine your concentration first: mg/mL = vial mg ÷ reconstitution mL. Then calculate: dose volume (mL) = target mg ÷ mg/mL. Always base the math on your exact vial strength and reconstitution volume.
What dose and frequency are best for skin vs. hair goals?
The best approach is usually goal-specific monitoring with a tolerance-first phase, then a steady maintenance pattern. Skin may show changes earlier than hair, but hair often requires a longer observation window. Adjust only one variable at a time (dose or timing) and track outcomes weekly.
How long should I run a GHK-Cu dosage protocol before judging results?
For skin-related observations, consider at least several weeks of consistent adherence. For hair-related goals, plan on longer tracking due to growth cycle timing. Use photos and symptom logs to make the evaluation objective.
Conclusion: Your Next Practical Step
A strong ghk cu peptide injection dosage protocol is built on disciplined reconstitution math, a tolerance-first phased plan, consistent injection scheduling, and clean data tracking. If you get those parts right, you’ll reduce mistakes and make your results interpretable—whether you’re aiming at skin support, hair health, or recovery.
Next step: Write down your vial mg and planned reconstitution mL, calculate your mg/mL concentration, then create a simple 3-phase schedule (entry week, maintenance weeks, then evaluation) with a weekly photo + symptom log.
Discussion